Grading
Road and Site Vertical Geometry is the Same
The Vertical Design tools found in the Vertical group of the Geometry tab encompass both "traditional" roadway geometry tools and the "detail grading" tools under the same philosophy and architecture. They are not separate technologies, they do not have separate philosophies. The tools play by the same rules and provide the same CONNECTed Results, including honoring your Design Intent.

Site Layout tools
The new Site Layout Tools do, actually, differ in their underlying architecture. The Site Layout Tools automate horizontal layout and optimize grading very quickly. Once a Site Concept is "finalized," the tools build a model using the "traditional" Bentley Civil horizontal 3D geometry. You get a model very close to a final design, except for detailed grading such as for drainage. If you need to grade to inlets or otherwise warp the design, the "traditional" Civil Geometry tools can be used to provde precise design.
Master Just Two Tools
- Category: Grading
When grading, these are some best practices
- ALWAYS have the 3D Model visible so that you can confirm your results. Some tools require you to manually set the new profile element to Active.
- Reviewing the new profiles in a Profile Model provides precise feedback
- Adding new elements to a terrain provides the best grading feedback: contours show grading results best.
- Category: Grading
Hands-on: Use Draping Surfaces to Warp a Parking Lot for Drainage
Engineering Task: Grade a Parking Lot with a Cross Slope and then a warp to ensure positive drainage.
Dataset:: Draping Surface dataset (zip file)
Most Appropriate Pre-requisite: Non-Corridor and Site Modeling course.
Video: Creating the Draping Profiles.mp4
Imagine a fairly straightforward grading requirement, but a complex curbed parking lot with lots of islands and detail work.

Computing appropriate slopes along each element would be ridiculously difficult. An easy and intuitive technique is to create a "draping surface". The draping surface provides a simple intutive - and easily changed - terrain that design elements get their elevations from.
- Category: Grading
Hands-on: Profile By Slope from Point
Engineering Task: Grade a Parking Lot 1% upward from an Existing Inlet
Dataset:: Profile by Slope from Point (data zip)
Most Appropriate Pre-requisite: Non-Corridor and Site Modeling course
- Open the working file.
- Verify there is a Parking Perimeter and a Existing Inlet in the lower left corner.
The Inlet should show in the 3D Model.
- Click Profile By Slope from Point.
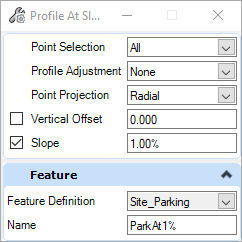
- Match the Settings shown
|
Point Selection: All Profile Adjustment - None Point Projection: Radial Slope: 1% |
 |
- At the Locate First Element to Profile prompt, click on the parking perimeter
- At the Locate Next Element to Profile - Reset to Complete prompt, right-click to Reset
- At the Locate Reference 3D point, click on the Inlet in the 3D view.
- The software will prompt through the other settings. You should have set them above. You should be able to simple confirm them with a click.
- Category: Grading
Remember: the Site Profiling Tools are NOT different technology, different architecture, or different philosophy from "traditional' Corridor Vertical Geometry tools. They are additional tools that solve additional engineering constraints.
The core of the additional "Site" Grading Tools are these in the Geometry > Vertical Geometry ribbon group:

Profile From Surface is the primary way to get vertical geometry from or relative to a Terrain.
- Category: Grading
Page 1 of 2
- You are here:
-
Home

-
Bentley Guidance
-
Training Supplements
- Drainage Grading